djcwardog
-
Posts
7 -
Joined
-
Last visited
-
Days Won
4
djcwardog's Achievements
")
Newbie (1/14)
-
 Chris109 reacted to a post in a topic:
3G to 4G Modem upgrade with used (recycled) parts
Chris109 reacted to a post in a topic:
3G to 4G Modem upgrade with used (recycled) parts
-
3G to 4G Modem upgrade with used (recycled) parts
djcwardog replied to djcwardog's topic in Audio, Navigation and SYNC
I had no dealer involvement at all in doing this. As described above, I did have FORScan do a forced reset of the modem after I had it plugged in. -
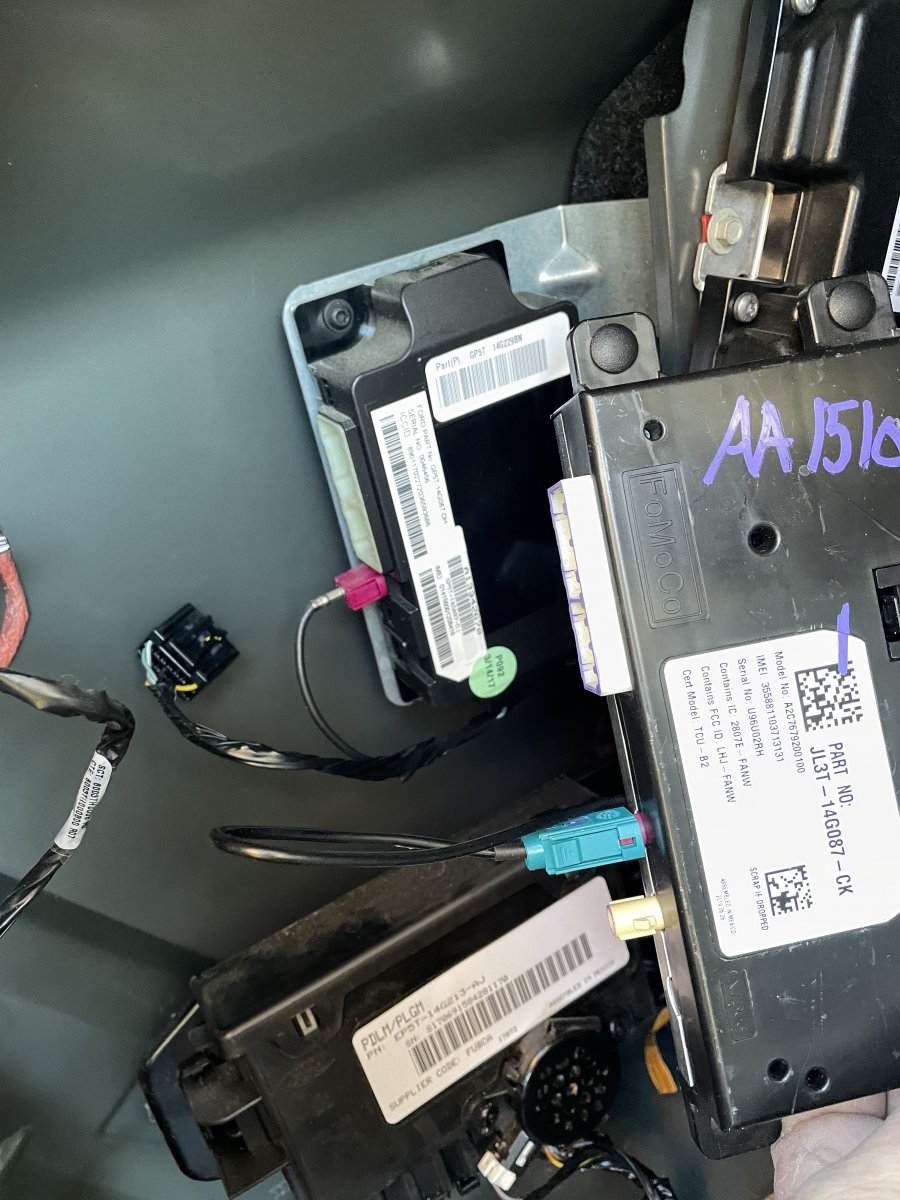
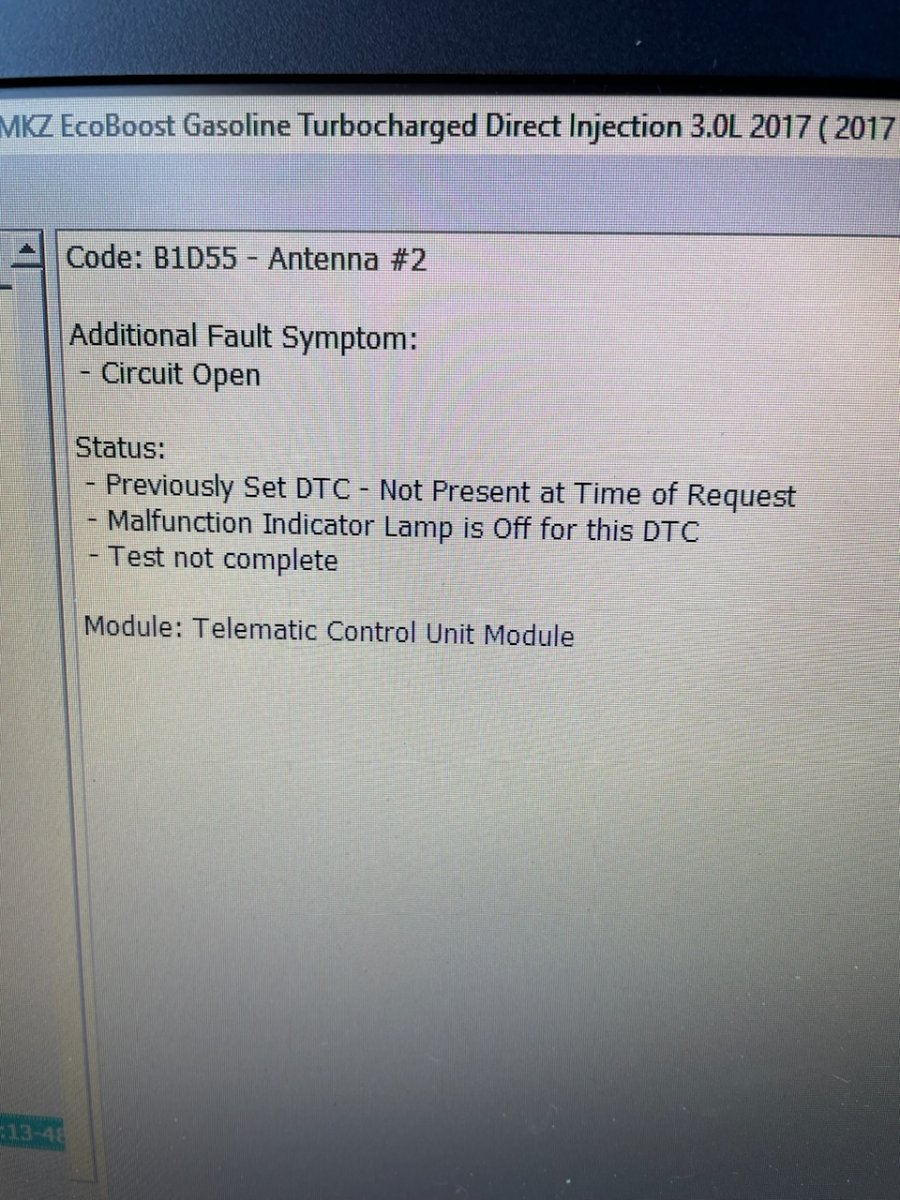
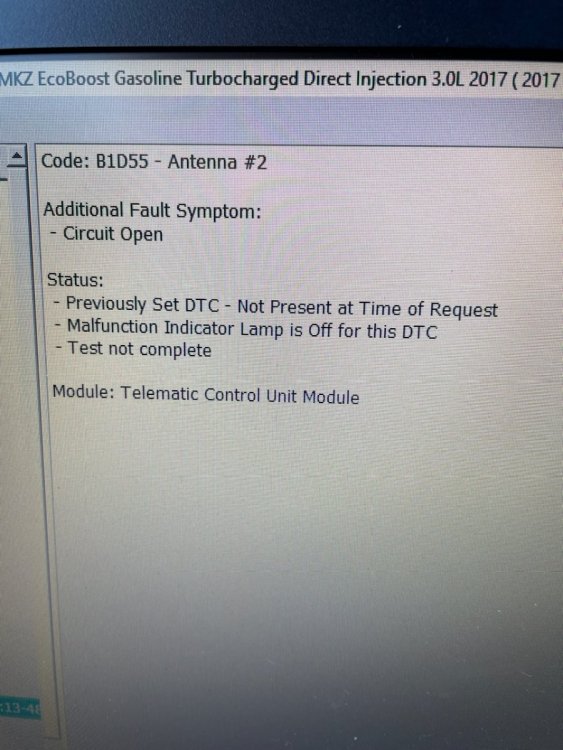
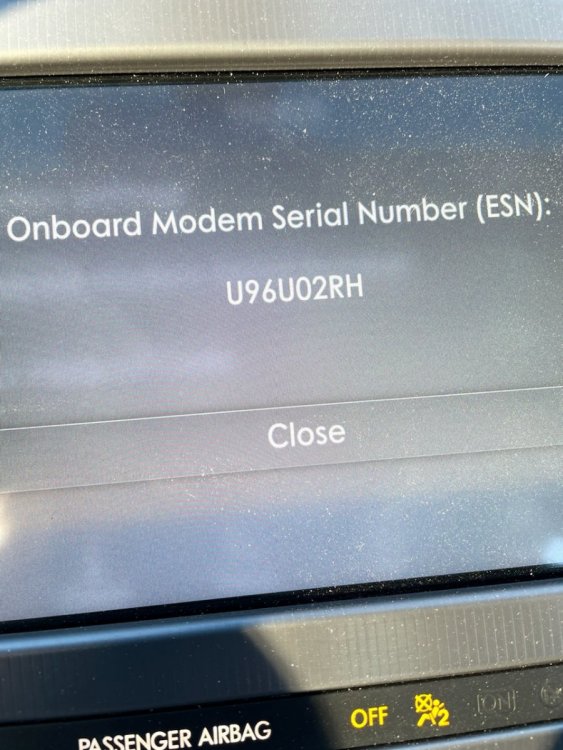
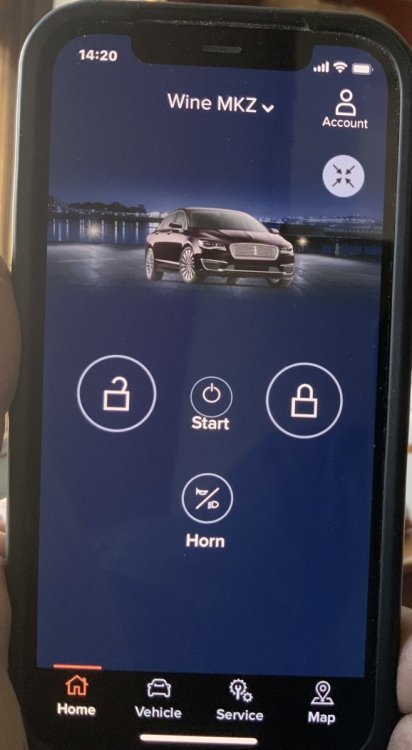
I did some searching and found this topic well-covered on the web but not so much here for this group. I bought my car a few weeks ago and discovered, like many of you, that the Lincoln Way app was useless for me thanks to the 3G modem that came from the factory when my car was new. So, I found and installed this particular 4G modem on eBay for $75 shipped. PART NO: JL3T - 14G087 - CK I read and understood that any of the -C_ part # suffixes should work. Mine is a -CK but others are out there for sale right now. The key is to stick with the older JL3T parts rather than the very latest ones - at least for my 2017 car! This is a possible way to swap in a 4G modem for your existing 3G modem that should work for you. Pull up the left (driver’s) side panel in your trunk to start. In the photos you see that I moved the single power and CANBUS plug over and then moved my single FAKRA antenna plug over. You see two FAKRA jacks in the photo. However, only one of them will accept your existing antenna plug. Seeing the word “GPS” on the old 3G part I have a feeling that the 3G modems need a GPS antenna FAKRA jack because they also incorporate the GPS function that your car uses to provide the compass in the dash display. Nerdy Detail Alert - I think for our cars with Navigation there is indeed another (blue?) GPS antenna plug that goes into a jack on your APIM - the silver box that you’ll find secured to the center dash bezel right behind your 8” screen. Anyway, I plugged a Bingfu 4G Wi-Fi antenna (cheap, on Amazon) into the other jack - see photo - and then did my Forscan work, as noted below. First, delete your existing car profile in Forscan and let it find your car again when you connect. This makes it build a new profile that includes your replacement 4G modem. You should see a TCU included in your module list once the car finishes connecting. Now let it save this new profile for you by clicking “yes” when it asks. Under “Service Prodedures”, do a forced reset of the “new” 4g TCU. Read and clear any codes that may remain in the TCU afterwards. See my photos. You’ll end up with one code for “Antenna 2” that will not clear. No worry, that’s harmless and it’s there because you used the Bingfu antenna instead of paying more money to find and install the factory Ford 4G antenna under the rear deck between your speakers, and its required extension cord. Now do the TSB 22-2230 initialization procedure - you’ll find that on an internet search if the attached .pdf doesn’t work for you. This is the procedure that has you go in and out of Valet Mode to initialize the modem. As that procedure requires, I deleted my car from the Lincoln Way app and then added it back on. When I clicked “Activate” in the app it sent the expected message to my screen in the car asking me to approve the car. I did and I then finally saw the lock/unlock buttons, start/stop button and the horn/light flash buttons. Now my Lincoln Way app does what it must have been doing before they dropped 3G modem coverage last February. I also snapped a photo of the Sync 3 screen that shows my modem ID. It’s indeed different from the same screen when I had the 3G modem in there. New part compared with old. 4G modem is bigger and it has two Fakra jacks instead of just one on the 3G part. Recall Service Bulletin to set up 4G modem.pdf The circuit is just fine, thank you very much. Snap a photo of this screen in your own car before and after you do the swap. Before I did the swap, everything below the car was just an empty blue field.

-
TomV reacted to a post in a topic:
Revel 14-speaker system subwoofer upgrade
-
Revel 14-speaker system subwoofer upgrade
djcwardog replied to TomV's topic in Audio, Navigation and SYNC
Tom V, your threads got me going in adding a sub to my Revel Ultima system. I replied to your Revel 14 to Revel Ultima 20 upgrade thread to lay out what I did. I’m still experimenting with a front-left trunk location for my box and listening as I have it a) firing into back seat or b) across from left to right. I also used Forscan to disable both ANC and ESE. I laid all this out here, in Tom V’s other thread: Tom V’s Revel 14 to Revel Ultima 20 Upgrade Thread -
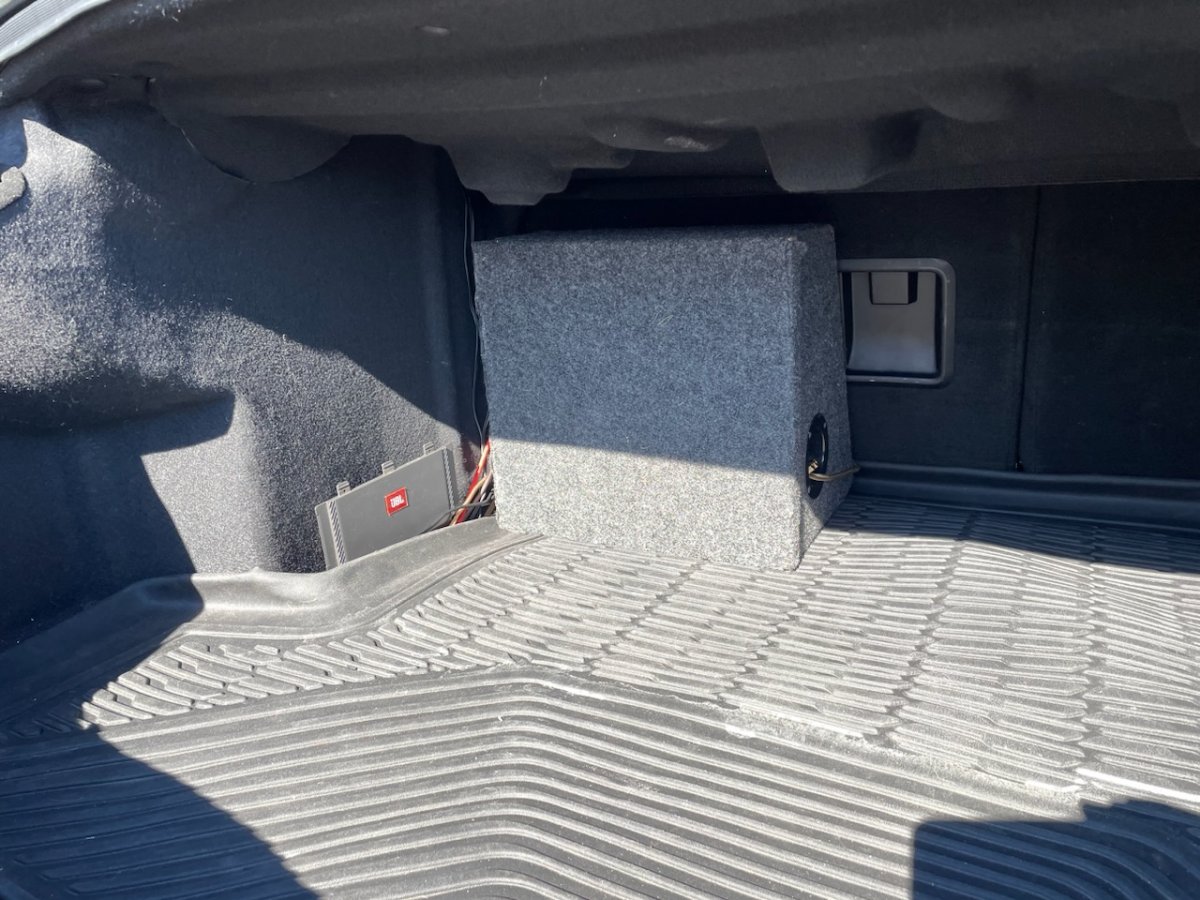
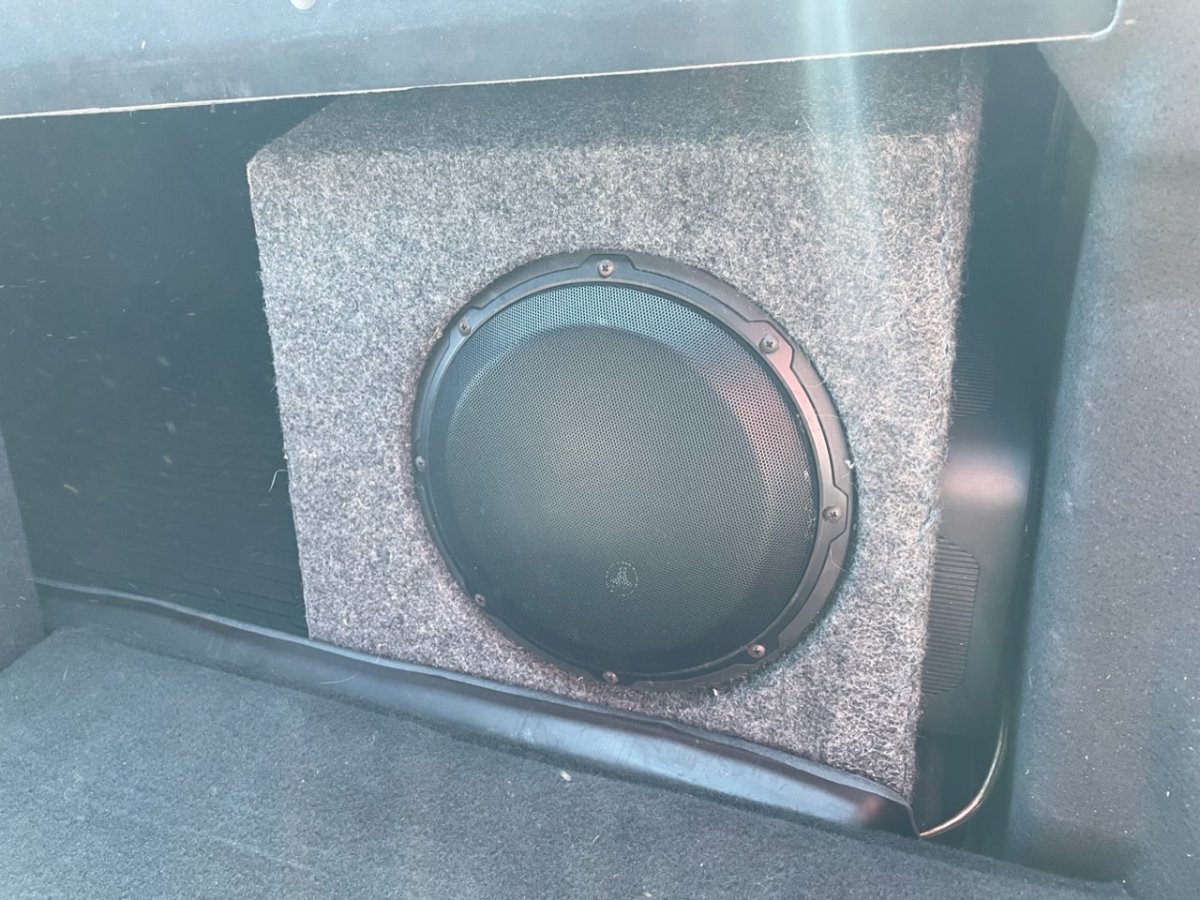
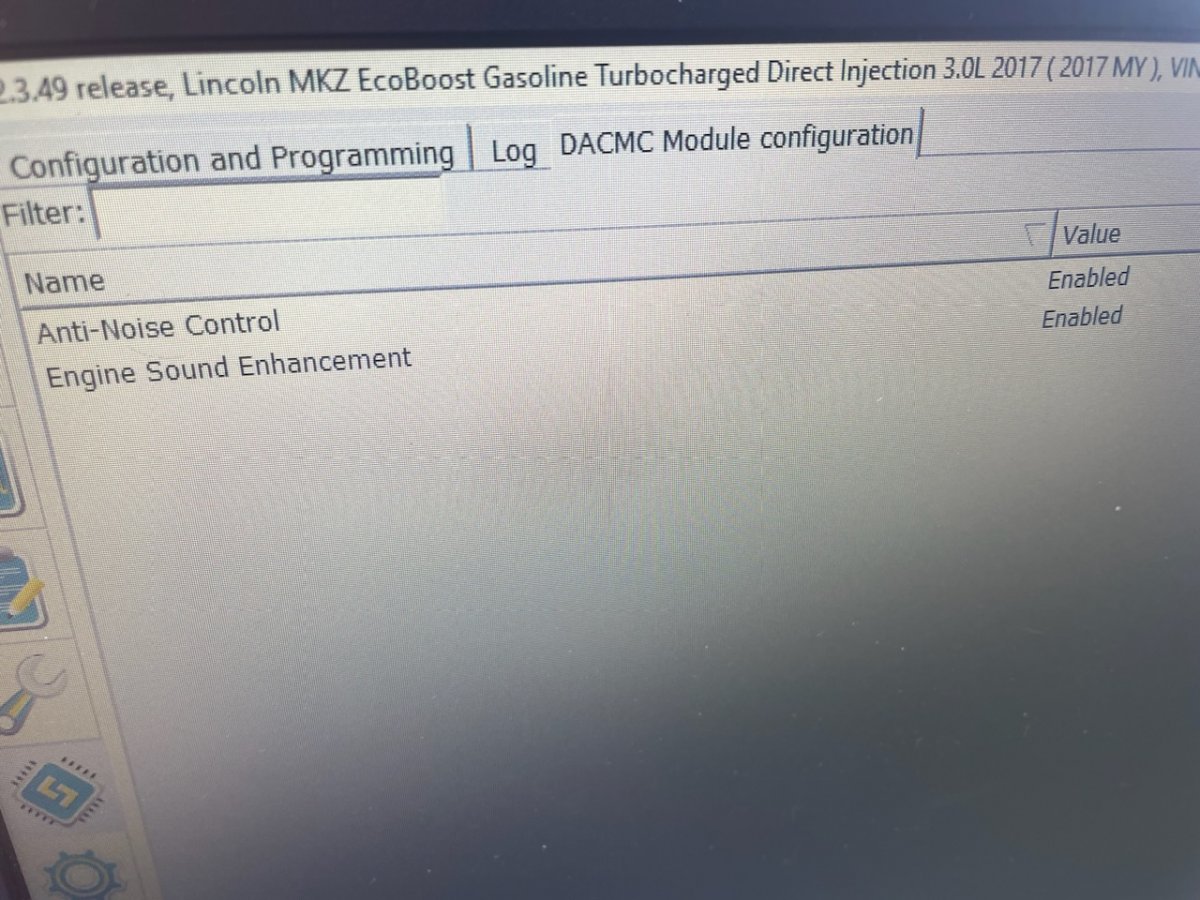
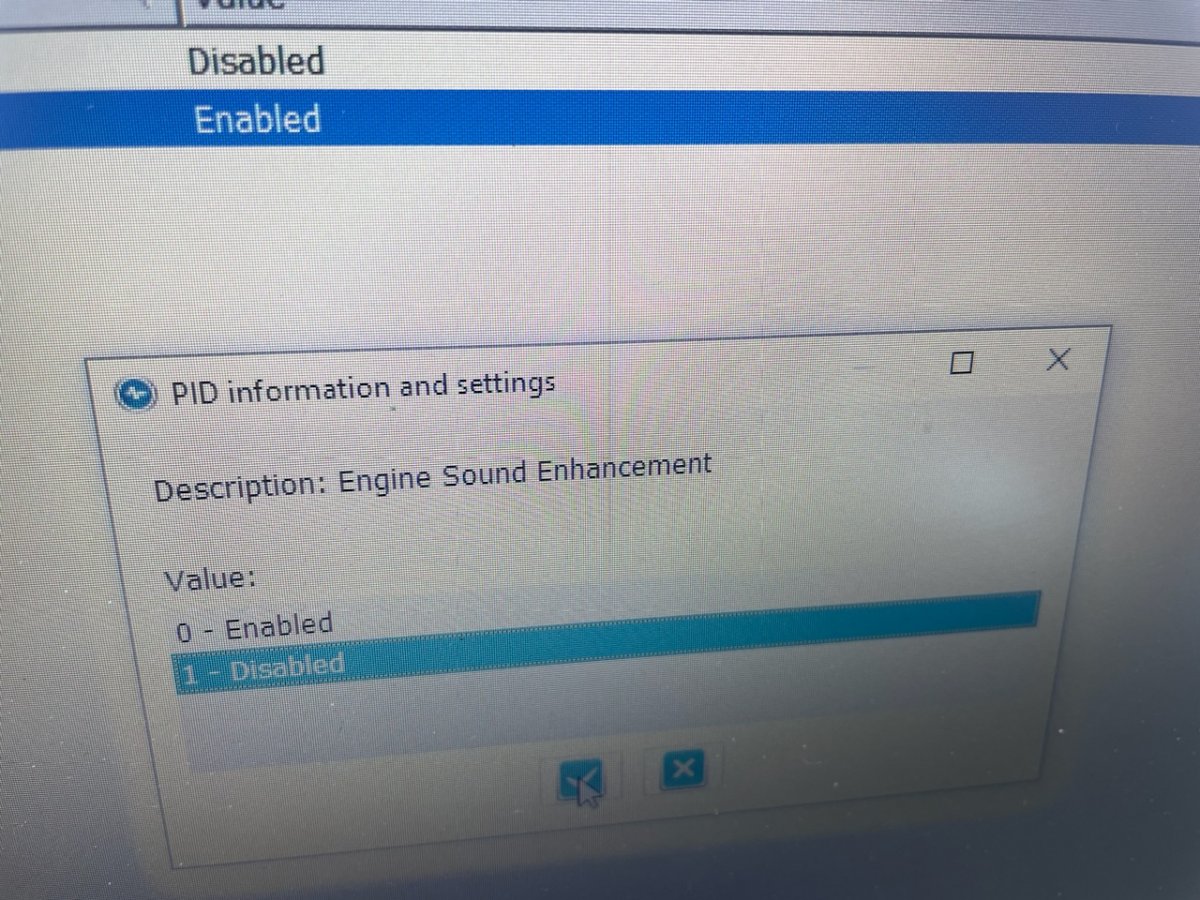
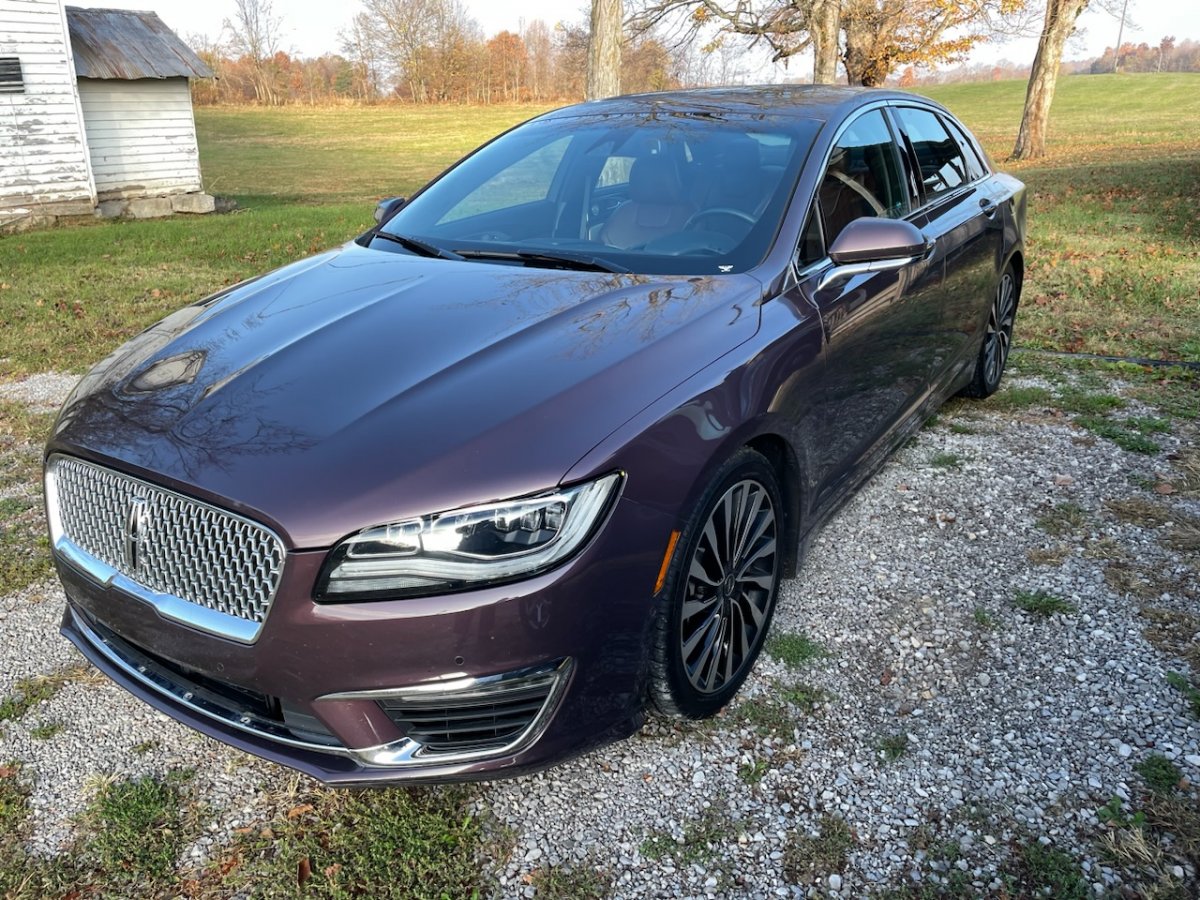
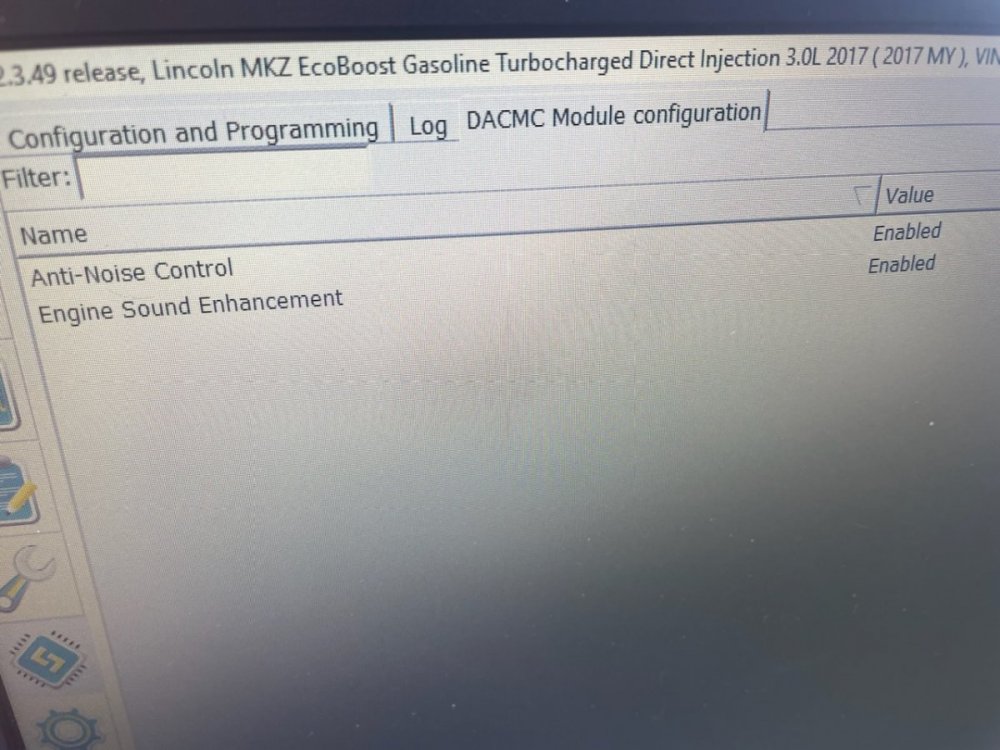
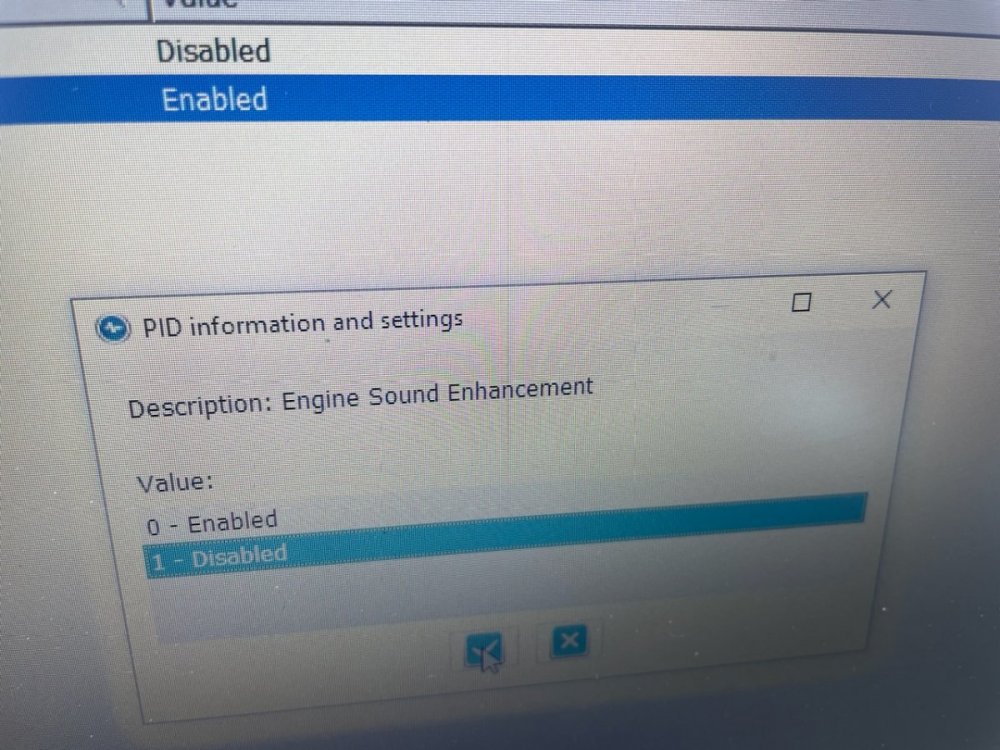
So, fast forward a year and a half and I have bought my Lincoln MKZ. It’s a 2017 MKZ Black Label so it has the Revel Ultima system. It sounds wonderful! However, the very deepest bass could be augmented just a touch for full enjoyment of the deep bass from the King of Instruments - pipe organ! I had the parts on hand to add a small 10” sub box driven by a JBL Club A600 amp. This accepts high-level (speaker wires) signals for both the source and to turn itself on. I tapped into the pair of 6x9 factory subs in the rear deck and mounted the small amp to the side of the sub cabinet. Not yet seeing a factory wiring diagram and pinout for the electronics and speakers of this system, I made the wires closest to the connector tab my “positive” wires. I can listen and switch the sub amp polarity if I got it backwards. help? Simply adding a tasteful sub can help with any sound system if done with knowledge and care. Tune it with white noise and fine tune to taste. I’ll start with minimal sub output and go up to just get that last bit of lowest octave extension in this otherwise superb car and audio system! As the photos show it is quite a simple add-on for me. Run a heavy power cable from battery to trunk (not this 8-ga, but a 4-ga I have on hand), use same-size wire to ground amp near its mounting location (factory ground points are nearby - behind left-side trunk panel adjacent to the telematics modem), tap into two stereo pairs of speaker wires and send the sub output speaker wire to the sub itself. With enough slack, I can unhook the sub when necessary (careful to avoid shorting out the speaker wires though while it’s out) to regain full use of the trunk. Some subwoofer geekery: The Alpine 10W3 wants ~0.625 ft3 of box volume. Its 12” bigger brother wants about twice that. Problem is that many off the shelf sub boxes have 1.2 ft3 (or larger) volumes for a sealed box. Shop carefully or build/modify your own. SubThump offer a twin sub box for the Ford Fusion 20016-2020. Although they will cut one or two holes in it, 10” or 12”, your choice, that box is only suitable for a pair of 12” Alpine 123W3 subs. Now, if you go with a ported box, the allowed volumes roughly double. But I want pure bass without any peaks near the tuned port frequency. So I stick with sealed boxes. The box in my photo was a SubThump built for the trunk, forward-firing, flush into the seat backs of the 2015-2022 Ford Mustang. It offers a single 10” hole and a 0.711 ft3 (I calculated it) volume. I cut the ears off of of it and used the fabric to hide what I did. Good enough for the trunk! I’ll put it up against the seat back in this car as well. Although just a bit too big in volume I’l bet it works great! If I must, I can cut down the left side after peeling back the fabric and remove a linear inch (draw a line vertically and move the left wall rightward a bit closer to where the speaker rests now) or so to reduce the volume. Doubt I’ll need to do that though. Many silver speaker grilles. I’d prefer them in black, as Tom V did! What a gorgeous wine red color. I’ll snap the amp cover back on once I’m sure I’ve tweaked the sub amp settings to suit me. Unplug those 6x9 speaker connectors and tap in your wiring to feed the sub amp its signal. When done, use some fabric taped to tie both your wires together at the middle area under the deck. Zip tie your bundle there and then run it down and to the left side where the amp waits. Rear seat down shows the 21st speaker in my car. Be sure you are running the latest version of Forscan (3.49 when I did this) and look for the DACMC module. Choose the “configure” option rather than the “as-built” option. Do that and run the procedure. You’ll see just two things you change. Choose “Disabled” for both ANC and ESE. Here’s the menu for ESE Here’s the first screen you see when you run the “configure” procedure for the DACMC module.


-
jmcgliss reacted to a post in a topic:
New here w a 2017 MKZ Black Label 3.0T AWD
-
Thanks for the welcomes! I’m checking into getting the switch panel or replacement buttons along the right side of my infotainment screen. My hazard lights won’t work and my auto park won’’t function. Plus those buttons do not light up at night…. Otherwise, this car is awesome!


-
gfong reacted to a post in a topic:
New here w a 2017 MKZ Black Label 3.0T AWD
-
My last Lincoln was a 1975 Mk 4 with a souped up 460 and race-built C-6 transmission. That car seemed to be Lincoln’s last gasp at using the best FOMOCO components - stout 460 big block, C6 trans, 4-wheel disc brakes w rear anti-lock - all hydraulically boosted (no vacuum brake booster) and a Ford 9” rear. Most folks failed to understand why, but I loved that car for 40-mile Interstate commutes to work. What it was built for! I think my next (and current) Lincoln offers a bit more…. The Drivers Package really help to keep all 400 HP down on the pavement. These are very nice cars and I plan to enjoy mine.
-
Deleted